
| 일 | 월 | 화 | 수 | 목 | 금 | 토 |
|---|---|---|---|---|---|---|
| 1 | 2 | 3 | 4 | 5 | 6 | 7 |
| 8 | 9 | 10 | 11 | 12 | 13 | 14 |
| 15 | 16 | 17 | 18 | 19 | 20 | 21 |
| 22 | 23 | 24 | 25 | 26 | 27 | 28 |
| 29 | 30 | 31 |
- 전자공학
- GPIO
- Arm
- RTOS
- 아트웍
- EMBEDDED
- terminal
- 임베디드
- 임베디드시스템
- mcu
- PCB
- 초보개발자
- easyeda
- 7 세그먼트
- Developer
- CCS
- TM4C123GXL
- 마이컴
- 8051
- m4
- MAC OS
- TM4C123
- Embedded System
- JLCPCB
- bldc
- TI
- St
- IoT
- Programming
- 모두의연구소
- Today
- Total
Engineering Agit
[Session 02 TM4C123GXL Study 01] - How to create new project in CCS 본문
[Session 02 TM4C123GXL Study 01] - How to create new project in CCS
Sean_Kim95 2020. 9. 25. 16:23◈ 본격적으로 TM4C123GXL (TM4C123GH6PM)를 이용한 개발을 하기 전에 어떠한 과정으로 Properties를 설정하는지에 대해 다뤄보고자 한다.
[Session 02 TM4C123GXL Study 01] - TM4C123GXL 개발환경
1. CCS (Code Composer Studio) Texas Instruments의 IDE로 Eclipse기반이다. 대부분의 Code editing 작업과 complie, debugging 및 다운로드 작업을 이곳에서 진행한다. 2. TI Cloud Tools 링크: https://de..
engineering-agit.tistory.com
※주의!
절차대로 따라가지 않으면 build시 혹은 debug시에 문제가 발생할 수 있음.
1.

CCS를 실행하고 위와 같이 'File->New->CCS Project' 경로로 들어간다.
2.

그러면 위의 그림과 같은 창이 뜨는데 이때 건들여야할 사항은 'Target', 'Project name', 'Compiler version' 그리고 'Project templates and examples'이다('Connection'은 나중에 project properties에서 설정하도록 하자). 이중에서 'Compile version'의 경우 사용하는 보드(칩)에 따라 다르며 본 study에 사용되는 TM4C123GXL은 'TI vXX.X.X'를 사용한다(구체적인 버전은 알아서 선택). Templates의 경우 보통 'Empty project'를 선택하며 필요에 따라 'without main.c', 'with main.c', 'Assembly-only' 그리고 'RTSC' 이중에서 고를 수 있는데 이는 CCS의 version에 따라 달라질 수 있으니 개발하고자 하는 application에 따라 적절한 template을 이용하도록 하자.
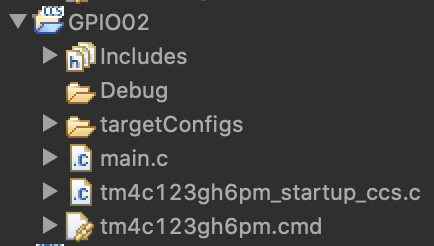
'Empty project with main.c'로 template을 정하고 finish를 누르면 다음과 같이 'Project Explorer'창에 프로젝트 폴더 안에 필요한 기본사항들이 담겨진다. 'Include'에는 '<stdint.h>' 나 '<inc/hw_memmap.h>'와 같은 이미 만들어져있는 header들이 담겨있다. 'Debug'에는 project build 이후에 생성되는 파일들이 담기는 곳으로 object file이나 .out file등이 담기게된다. 추가적으로 .out file은 'Binaries'라는 폴더가 build 이후에 생성되는데 이 안에도 담기게된다.

'targetConfigs'에는 .ccxml file이 생성되는데 이는 'Target configuration file'이라고 칭한다. 이 file은 위의 그림과 같은 content들을 포함하며 이 file에 관하여는 다음 링크를 통해 자세히 알아 볼 수 있다.
Debug Handbook for CCS - Texas Instruments Wiki
From Texas Instruments Wiki This page is no longer maintained and is kept here for reference only! Please go to this link for the most current version. Introduction[edit] This document is intended to serve as a "handbook" for all things related to Code Com
processors.wiki.ti.com
'main.c'는 main함수를 포함한 source file이며 개발자의 필요에 따라 code를 추가작성할 수 있다. 'startup_ccs.c'는 startup code를 담은 source file이다. '.cmd'는 Linker command file이다.
3.

이제 'Project Explorer'에 있는 해당 project를 오른쪽 클릭하여 'Porperties'를 누르면 다음과 같은 창이 뜬다.

이제 총 3가지의 작업을 해주어야한다. 먼저 'TIVAWARE'을 include하여 필요한 header를 사용할 수 있게 하는 작업, Linker가 해당 library를 찾으러 갈 수 있게 하는 'file search path', 그리고 'connection'관련 option 설정이다. 기본적으로 3가지이고 추가적인 사항들(최적화 설정등)은 필요에 따라 설정하도록 하자.
첫번째 작업은 'properties->build->ARM complier->include options->add dir to #include search path'에서 이루어진다. 여기에서 '+'를 누르면 다음과 같은 창이 뜨는데 이때 추가할 'tivaware' 폴더를 선택해주면 된다.


그 다음에 두번째 작업은 'properties->build->ARM linker->file search path->include library file or command file as input'에서 이루어진다. 여기에 다음 그림의 경로에 위치한 'driverlib.lib'를 추가해주면 된다.


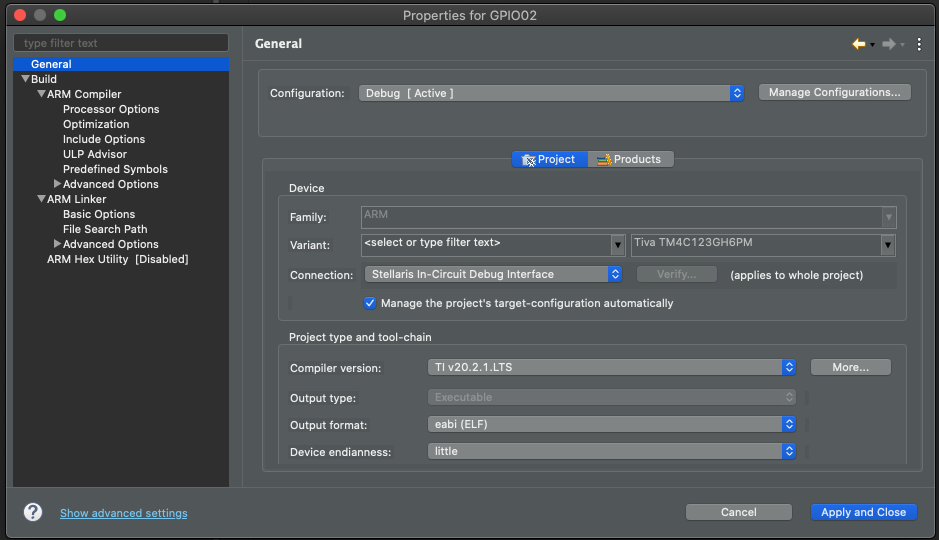
TM4C123GXL의 경우에는 'stellaris in-circuit debug interface'를 이용하여 실행 파일을 host로부터 target에 다운로드한다. 따라서 connection은 위의 그림과 같이 설정해주면 된다.
4.
이제 'Apply and close'를 누르면 개발코드를 작성할 준비는 끝이다.
'Embedded Lab. @ Modu inst. > 2020 Session 02 (2020.06~)' 카테고리의 다른 글
| [Session 02 TM4C123GXL Study 02] - GPIO 04 (0) | 2020.10.04 |
|---|---|
| [Session 02 TM4C123GXL Study 02] - GPIO 03 (0) | 2020.08.22 |
| [Session 02 TM4C123GXL Study 03] - Programming methods with CCS (0) | 2020.08.11 |
| [Session 02 TM4C123GXL Study 02] - GPIO 02 (0) | 2020.08.07 |
| [Session 02 TM4C123GXL Study 02] - GPIO 01 (0) | 2020.07.28 |


